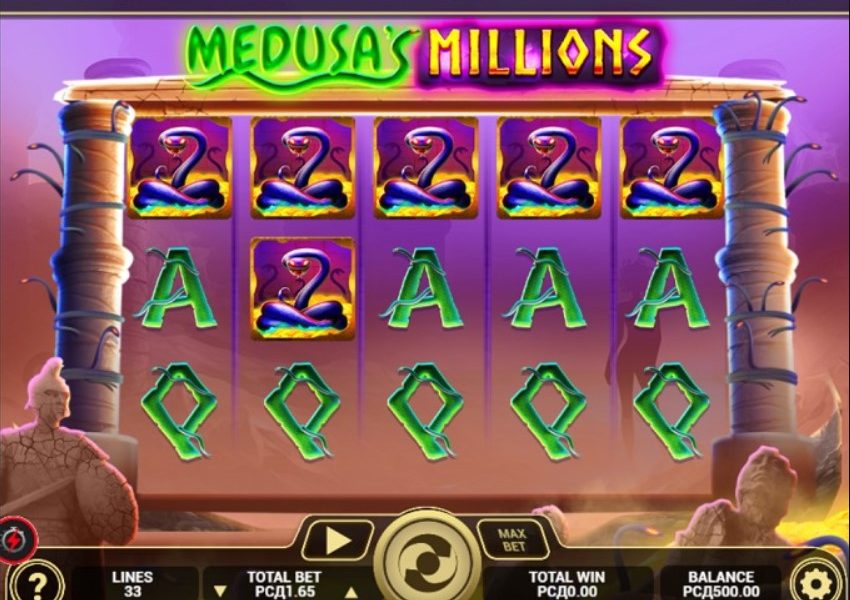
Pasta with Roasted Garlic and Butternut Squash Cream Sauce

A few weeks ago, I saw a tweet from the local Whole Foods about a recipe contest with roasted garlic. Contest? Ooh, let me check this out…yep, your “best recipe with roasted garlic.” At once, the gears in my head started grinding.

Y’see, I’ve been eating a lot of garlic since starting my “anti-inflammation diet” and I think it’s been a big help (moreso than the green tea). So I had garlic on hand to spare. But what to do with it that’s really good and unique? I wanted something that would stand out in the crowd of recipes, but nothing too complicated. I looked around the kitchen, spotted a butternut squash and I was on my way. But not a soup. Oh no, butternut squash soup? So done. A pasta sauce! And so this was born.

I posted the recipe and kept my fingers crossed. There was a lot of good competition. I thought for sure I’d be bumped out in favor of some of the more exotic and omnivorous entrants. But then I found out that I’d made it to the final two! That this lovely person who tests recipes had made my cream sauce and loved it! What a thrill! Here are the notes:

Lesley Eats’ simple, healthy pasta sauce is so silky and rich you won’t even notice, let alone miss, the butter found in creamy sauce rivals. The roasted garlic and butternut squash make for a happy pair and cooking the two together melds the flavors beautifully. The final flourish of grated Parmesan sets this dish apart — don’t skimp on it! Seconds were requested around the table. Note: a 2 1/2 pound butternut squash will provide more than enough for a pound of pasta, so freeze the rest of the sauce for another quick meal.

So making it to the finals was pretty awesome. But then I needed to win. There was a $100 gift card to Whole Foods at stake. So I appealed to all my friends on Twitter and Facebook and I’m happy to report that with all your help, I won! I could not have done it without you all.

THANK YOU!

So here’s the recipe. It’s also viewable on the Whole Foods site as well as a nice little Q&A they did with me before I knew that I’d won (I admit I might’ve been a little more loquacious afterward).

Pasta with Roasted Garlic and Butternut Squash Cream Sauce
Serves 4-6

Ingredients
1  medium butternut squash
2  bulbs garlic
1 teaspoon olive oil
1 cup milk (unflavored soy milk or coconut milk can be substituted)
1 teaspoon dried thyme
1 teaspoon salt
1 teaspoon herbs de provence
1/2 teaspoon cumin
1 pinch cayenne
pepper to taste
1 pound dried penne pasta (this is also good over ravioli or tortellini)
1/4 cup finely grated parmigiano-reggiano cheese

Pre-heat oven to 400F.                             

Cut the butternut squash in half lengthwise and remove the seeds. Place cut side down in about a 1/2 inch of water in a large dish, poke holes in the skin with a fork and roast for 45 minutes (or until soft and the skin is browned).                           

Meanwhile, peel the garlic bulbs until just one thin layer of skin remains (but bulbs stay intact) and cut a small segment off the top of each bulb. Drizzle half the olive oil over each bulb and wrap in aluminum foil. Place in the oven with the squash when there’s 30 minutes left to cook.                               

When the squash and garlic have finished cooking, remove from the oven and set aside to cool (approximately 10-15 minutes). 

Peel the skin off the squash and place in a large bowl. Remove the individual cloves of garlic from each bulb and add to the squash. Add the remaining ingredients and puree (with an immersion blender, mixer, or food processor). Add pepper (and more of the listed seasonings, if necessary) to taste.                               

Cook pasta according to directions (al dente) and drain. Spread the sauce over the pasta and top with grated parmigiano-reggiano cheese.   

Posted in Entrees, Fun, News, Recipes | 7 Comments

Apple Muffins

This recipe is an adaptation of an adaptation. Actually, a second edition of an adaptation of an adaptation! But let me back up just a bit.

I had some apples in the fridge that were a tad less than crisp, so I was looking for something interesting to do with them. I was thinking apple soup or another savory dish, but apple cider muffins kept popping up when I consulted the google. And man, those sounded good. One problem: I didn’t have any apple cider.

apple muffin imageSo I found this recipe over at Smitten Kitchen, adapated from a King Arthur flour recipe. I had everthing I needed on hand and–bonus–I could use the whole wheat flour that’s been darkening my pantry and ruining breads for the last two months. I added some allspice in order to get some of that cider spice (and a little vanilla because everything is better with vanilla) and made some really tasty muffins. But something was missing–they were light and fluffy and very yummy but just not very satisfying. There was some weight and toothiness I wanted that I wasn’t getting.

And they needed that because I wanted to make these for my friend, Beth. Beth just had a baby and our friend, Amanda thoughtfully set up a program to keep their family fed during this very hectic time. But there were two issues: 1) I’ve chatted with Beth’s husband on several occasions and I knew that anything I’d make for lunch or dinner would be just a side dish to him (bless his omnivore heart) and 2) I remember eating a lot of very unsatisfying cold bagels when Mini Eats was a newborn. She was nursing every two hours for a half-hour each time and there just wasn’t time to have a decent thing to eat. We were also quarantined for the first couple of months since she was nearly two months early.

apple muffin imageSo I thought that an easy-to-eat muffin that doesn’t need to be re-heated would be the perfect thing to make. But it needed to have some weight to it to get anyone through a two-hour interval. So for the second batch, I added half a cup of quick oats. Not a big deal, but it made a big difference!*

(*Um, yes, Beth, I ate a muffin. This recipe makes slightly more than the dozen I brought over. But they had to be tested first!)

Anyway, there are a couple of other minor changes I made. As usual, I used salted butter and still added the salt. It wasn’t too salty. I also used soy milk instead of buttermilk because that’s what I have at home. I have no idea how this affected the recipe, but I know that the muffins were still quite good. Also, after I cream the butter and sugar together, I just throw everything else in the bowl and let the KitchenAid do the work. I have yet to experience any real problem with this, but I will mostly copy the directions here from the original. But you should know it’s okay to take a shortcut if you want.

Need more convincing? These muffins are really easy to make. I don’t love peeling apples, but other than that, you go from zero to muffin pretty quickly and simply.

Whole Wheat Apple Muffins
Adapted from King Arthur Flour via Smitten Kitchen
Yield: 12-18
(I got 14 from the second batch)

Ingredients:
1 cup whole wheat flour

1 cup all-purpose flour
1/2 cup quick oats*
1 teaspoon baking powder
1 teaspoon baking soda
1/4 teaspoon salt
1 teaspoon allspice
1 tablespoon cinnamon
1/2 cup (1 stick, 4 ounces) butter, softened
1/2 cup granulated sugar
1/2 cup dark brown sugar, packed, divided into two 1/4 cups
1 large egg
1 cup (8 ounces) milk
1 teaspoon vanilla extract
2 large apples, peeled, cored, and chopped into small cubes (about 2 to 2 1/2 heaping cups)

*If you have regular rolled oats, you may want to pulverize them a bit in your food processor to get them smaller or they may not get very soft during cooking.

Directions:
Preheat the oven to 450°F. Grease and flour muffin cups and set aside.

Mix together the flours, oats, baking powder, baking soda, salt, allspice and cinnamon, and set aside. In a separate bowl, cream the butter and sugars until fluffy. Add the egg and mix well. Add the milk and vanilla and mix again. Then add the dry ingredients, mix and fold in the apple chunks with a spatula (by hand).

Divide the batter evenly among the prepared muffin cups (to the top of the cup), sprinkling the remaining 1/4 cup brown sugar on top. Bake for 10 minutes, turn the heat down to 400°F, and bake for an additional 5 to 10 minutes, or until a toothpick inserted into the center of a muffin comes out clean. Cool the muffins for 5 minutes in the tin, then remove them out onto a wire rack to cool completely.

When the muffins first come out, the brown sugar on top is nice and crunchy. However, after storing in an airtight container, it is crunchy no more. These muffins are moist.

TWSS.


Posted in Breakfast, Desserts, Recipes, Snacks | 11 Comments

The Green Tea Diet?

Generally speaking, I avoid fad diets and all the hubbub surrounding them. I’m a fan of moderation. So I missed it when (apparently) last year, this anti-inflammation diet was all the rage. It will prevent and cure everything! Blah blah. Right.

But let me back up for a moment.

Several months ago, I tore or strained (not sure which) my rotator cuff (at the front part of the shoulder). I did so by overreaching under an entertainment center to retrieve a toy. It was excruciating. But I recovered enough to forget what happened. So a few days later, I reached into the back seat (from the front seat) of my car for yet another toy. Whoo boy. Not good.

But I recovered somewhat. Except that every time I reached a certain way, it felt like someone was dragging razorblades down my arm from my shoulder. So I went to the doctor (and then another).

green_tea

A green picture of green tea that someone else took. Please save me green tea!

Long story short, I need to reduce the inflammation in my shoulder that’s now causing pain and nerve problems. The medicines known as NSAIDS (ibuprofen, naproxen, etc) cause stomach irritation in me that is worse than the shoulder pain. And cortisone gives me ‘roid rage that is unacceptable outside, say a WWF wrestling match or a Wal-Mart on Black Friday.

So I turned to the google to see if there were some foods that would help reduce inflammation (and foods that may be aggravating it) as I know a number of people who battle with arthritis and chronic pain and have mentioned that some foods are triggers. And that was when I was avalanched by all sorts of hype. I don’t want hype; I just want to know if there’s something I can do (along with ice and physical therapy) to make my shoulder heal.

And when you remove all the hype, what’s left is common sense (for the most part). Cut back on refined sugars, empty/simple carbs, highly-processed foods, dairy, and bad fats (animal fats as well as corn and other vegetable oils classified as OMEGA-6 fats). Eat whole grains, vegetables, OMEGA-3 fats (olive oil, fish), and a lot of flavorings/herbs and spices (garlic, ginger, chilis, cinnamon, rosemary, and just about every other one you can think of).

There were a few odd mentions, though. I read a few sites that noted avoiding the nightshade family would help—including potatoes and (gasp!) tomatoes. However, I choose to ignore this since capsaicin was listed as something that would reduce inflammation and it is a member of the nightshade family. Also, I’m not giving up tomatoes. Yet another site mentioned drinking green tea to reduce inflammation.

So, here’s what I’ve decided to do: reduce processed foods, refined sugars, dairy, and white flour and increase garlic, chili and herbs/spices intake. And green tea. So every time I think I’m hungry for a snack, I’m just going to make a cup of green tea (note to self: buy caffeine-free green tea). Mayhaps I will dub this the Green Tea Diet, catalog my (I hope) successes, and write a book!

Crap. I just googled “Green Tea Diet.” Seems I’m a bit late on this one, too. There goes my book deal. Regardless, stay tuned.

Posted in News | 9 Comments

Balsamic Onion Jam

Do you remember those tests in elementary school when the teacher would say to read through the whole problem before you start to answer? And it would end up being some trick and it was easy for the teacher to see who followed the directions? Funny, I loved those back then because I was great at following directions. And yet, (too) many years later, I rarely follow directions. And I don’t always read through a recipe before deciding (and starting) to make it.

Which is bad. Very bad. I learned this lesson the hard way not too long ago when making the first batch of balsamic onion jam.

Not a trick. This is the answer.

But let me start from the beginning. A local company, Perl Catering, has this wonderful balsamic onion marmalade (for non-locals, you can buy it in their Etsy store). I love this stuff. And I looked all over town for it just after Christmas to take to my sister-in-law for a hostess gift. But it was sold out. Everywhere. So I bought her something else and decided to make it myself.

I found this recipe, noted that I had everything I needed on hand, skimmed the instructions a bit and set about making it. And two and a half hours later, I had a really fantastic balsamic onion jam. That’s right–two and a half hours. I was exhausted. I was unamused. I was grumpy. Luckily, this stuff was truly delicious, so it was not time spent in vain.

But if I’d read more comprehensively, I would have noted a) the total amount of time and b) really, this was just caramelizing onions and then adding balsamic vinegar and sugar until it becomes a jam. And there are easier and faster ways to caramelize onions. The first step of which is not to have four onions in one skillet! Unless it is a giant electric skillet, which I do not have. Oh man, all the stirring and the waiting. Also, my method of caramelization cooks down the water in the onions before adding oil, which speeds things up.

But wait! That’s not all! Also, after two and a half hours, I got about 8, maybe 10 ounces of jam. A paltry amount. Though, to be fair, it was received by the hostess with glee as I had just enough left over from filling a small jar for her to serve it with dinner that night to the delight of all the guests. It really is that good. So, if you would like to have some for yourself, I present to you three options.

1. Make the balsamic onion jam according to this recipe. Get out your cooking Crocs and something with which to entertain yourself (hey, there’s a new cookbook from Love and Olive Oil! ETA: oops, it’s not out yet. Again, I did not read for comprehension. But I have previewed it and it is awesome.). You will love this jam.

2. Make this recipe instead, which is a variation:

Balsamic Onion Jam
yield 4-6 ounces

2 large onions, chopped into consistently-sized slices about 2 inches long and 1/4 inch wide
2-4 tablespoons olive oil
3 tablespoons sugar*
1 tablespoon molasses (or an additional tablespoon of sugar)*
2 tablespoons balsamic vinegar
1/2 teaspoon salt
(* or use 5-6 tablespoons brown sugar)

Add the onions to your largest skillet and set heat to medium. Stir occasionally while the water from the onions cooks off. Reduce the heat to medium low and add one tablespoon of oil. Stir occasionally. When the onions become transluscent and soft, add another tablespoon of oil and cook (still stirring occasionally) until the onions are a a medium brown color (add more oil if the onions dry out a bit but haven’t softened/browned completely). This will take 20-30 minutes (or a bit longer). Reduce the heat to low and add the sugar, molasses, vinegar and salt and cook until thickened to a jam-like texture. Taste and add more sugar, vinegar, and/or salt as necessary. It should be equal parts sweet and savory.

This entire process will take about an hour to an hour and a half.

3. Pay your $5 for a jar of balsamic onion marmalade from Perl Catering (available directly from them online or at the Farmer’s Market, at Lazzaroli’s and at the Turnip Truck). Frankly, this is your best option. The price is hardly more than the cost of ingredients, not to mention your time. And it’s very, very good. Spread it on some bread. Maybe have it with a little brie. Eat it straight from the jar. It’s really that good.

No, really. Just buy it. That’s what I will do from now on. I’ve confronted the challenge and won, albeit after a long while. So I can claim victory and move on. And tell you not to waste your time.

And now you have reached the end of this post. Turn your paper over and wait for your gold star.

Posted in Recipes, Side Dishes | 11 Comments

Balsamic Cranberry Jam

I remember a few years ago when my mom made cranberry sauce from scratch for the first time. Neither of us had any idea it was so easy. Seriously, here’s a recipe. (Spoiler alert: cranberries, water, sugar, cook 10 minutes). It’s truly embarrassing how many years we ate canned cranberry sauce without knowing any better.

She and I still disagree on how it should be made, though. She’s a purist. Little more than a few walnuts added to it. Me, I’m a fan of adding mandarin oranges.

Anyhoo, this year I had some leftover berries and the need for something with some oomph to accompany brie at a tiny little affair to celebrate the arrival of a tiny little dude (code for a sip-and-see). But I didn’t want sauce, per se. A jam! But no oranges…hmm…balsamic vinegar? It goes well with strawberries, so why not? Guess what–it’s good! So here’s a little recipe for some balsamic cranberry jam. It’s a little tart, a tiny bit sweet and with just a hint of balsamic flavor. You could use this in place of your average holiday cranberry sauce or year-round with cheese, cream cheese, on toast or with some sliced apples or pears (if you want to be healthy…and I do…I guess).

Balsamic Cranberry Jam
yield: about 10-12 ounces

1/2 cup water
6 ounces fresh or frozen cranberries (half a bag of fresh)
1/2 teaspoon salt
4 tablespoons brown sugar*
1 tablespoon balsamic vinegar

Bring water and cranberries to a boil. Reduce heat when the berries split, add salt, brown sugar and balsamic vinegar and simmer until desired thickness (stirring occasionally). About 15 minutes.

I used brown sugar instead of white because I like the molassess-y taste and thickness. You can use regular sugar, but it may not be as jammy.


Posted in Breakfast, Recipes, Side Dishes | 7 Comments

Spritz Cookies aka Spritzgebäck

Last year after Christmas, I treated myself to a cookie press. I only make cookies around Christmas, so I finally liberated it from its box to make Spritzgebäck–Spritz cookies–a German cookie so named because you shape them with a cookie press (or some other extruder).

Since I don’t have a German mother, I consulted Frau Google for a good recipe. You’d think there wouldn’t be that many, but there are and there are ever-s0-slight differences that can have a huge effect on the final cookie. I settled on a combination of two recipes (from Betty Crocker and allrecipes.com) and pored over dozens of reviews. I’m happy to report that the cookies are good! Very good! I dare say this is the very best spritz cookie recipe!

A few tips for the first-time spritz-maker, though:
1.  Chill the cookie sheets before spritzing. Either in the refrigerator, freezer or outside (if it’s cold and clean). I didn’t chill my dough, just the sheet and I had no problems with the dough expanding out of shape or not sticking to the sheet well at all.
2.  Do not overdo it with almond flavor. I used an almond emulsion and it still borders on fakey taste. Almond is a tricky flavoring.
3. Think about lemon instead. I really like the lemon/vanilla ones I made a lot. But I love lemon cookies. LOVE. I also did an orange-cardamom combo that was okay, but not great.
4.  Use good butter. Kerrygold, Cabot, Organic Valley–these are all good butters. A locally-made butter is even better, particularly if it’s fresh. Don’t use butter that’s been sitting around a while. Why? The butter flavor is the most prevalent in this cookie. If you don’t use good butter, you’ll know it.
5. You can use (less) regular sugar if you’d like, but the powdered sugar really creates a little pillow of a cookie that just melts in your mouth.
6.  Decorate with sprinkles beforehand by smoothing over a tiny bit of water to keep them in place. Or decorate after baking by dabbing the cookies with a little corn syrup first.
7. I acutally divided the dough into quarters to experiment with colors and flavors. It was easy to dial back the amount of extract and food color and add in to the small batches. I just pressed the dough out on plastic wrap and dropped on the liquids and rolled it up and turned it until the flavor and color was consistent.

Spritz Cookies aka Spritzgebäck
yields about 6 dozen

1 cup butter, softened (2 sticks)
1 1/4 cups confectioner’s sugar
2 1/2 cups all-purpose flour, sifted 
1/4 teaspoon salt (more if you use unsalted butter)
1 egg 
1 teaspoon vanilla extract
1/2 to 1 teaspoon lemon extract (or almond extract)
food coloring (optional)
sprinkles and colored sugar (optional)

Pre-heat oven to 400ºF. Beat butter and sugar in large bowl until creamy. Mix in the flour, salt, egg, extract and a food color, if desired (start with 2-3 drops and add more as needed).

Roll a portion of the dough into a log and insert into cookie press. Spritz desired shapes on a chilled, ungreased cookie sheet. Decorate with sprinkles and sugar.

Bake 6 to 8 minutes until set, but not brown. Immediately remove to cool on a wire rack.

Posted in Desserts, Recipes | 4 Comments

Enchiladas: easier than you think

I’m ending Tomato Week II: Tomatwo with another super easy recipe that you can customize to suit your needs and tastes. The enchilada. The lasagna of Tex Mex cuisine. Which reminds me, I’ve gone around the world this week. Truly, tomatoes are beloved and featured in cuisines all over the world (as well they should be). Or, at least, in the areas where tomatoes can be grown easily (includes most places that are not my yard). Not sure that tomatoes figure heavily in Scandanavian cuisine (if you can call it that).

Anyway.

I don’t know why I don’t make enchiladas more often.  Probably the hardest/most time-consuming part is re-fatting the tortillas (which should be corn tortillas, in case you don’t know like that one contestant on Top Chef). And that’s not difficult at all. Here’s a recipe and instructions for re-fatting the tortillas.

Much like with lasagna, you can stuff just about anything into an enchilada. My favorite combination is black bean and sweet potato. But you can use any kind of bean you like (within reason) and a number of other vegetables. And cheese. Don’t forget the cheese.

Let’s brainstorm, shall we?

Beans/legumes: black beans, kidney beans, pintos, navy, white, pigeon peas, lentils, chickpeas, soybeans

Vegetables: sweet potatoes, butternut squash, acorn squash, yellow squash, zucchini, cabbage, shredded carrots, kernel corn, baby corn (why not?), broccoli, roasted peppers (yellow, red, green, chipotle, whatever), cauliflower, kale, chard, spinach, beets, parsnips, rutabagas (okay, I don’t know this for sure; I’ve never had a rutabaga. Or rhubarb, for that matter. But I like to say rutabaga. I’m saying it in my head right now.)

Other: mushrooms, fake meats, tofu, crumbled tempeh, seitan, quinoa, Israeli couscous, barley, cheddar cheese, queso blanco, goat cheese

Compulsory: diced tomatoes or salsa.

If I had any idea how to do such a thing, I would make an “enchilada generator” and use the above ingredients to populate a database to come up with unique enchilada fillings. Though you need a sauce, too for the top. I won’t advocate for a tomato-less enchilada (they need to be somewhere–inside or out), but I am not opposed to the topping of a creamy sauce. This avocado lime cream is uh-mazing on top of an enchilada. Salsa verde makes a good topping, too. But I usually just use plain tomato sauce and with cheese.

So, you’ve chosen your fillings, right? Mix them up in a bowl, spread them in the tortillas, roll them up and bake them until all the cheese is melted. Here’s a visual for you:

Fill. Roll. Bake.

So easy! Sit back and enjoy knowing you’d easily spend $5-8 on this if you got it in a restaurant…
***
And now that this season’s Tomato Week is over, what did I miss? What are your favorite recipes with preserved tomatoes that gets you through the winter and spring?

Posted in Entrees, Recipes | 2 Comments

Mediterranean Pasta

It’s still Tomato Week II: Tomatwo, which means I’m posting yet another recipe with canned tomatoes. I told you I like tomatoes. I was not joking.

Can't you just envision eating this on a Cyprian terrace overlooking the cobalt blue waters of the Mediterranean Sea? I can.

Mediterranean pasta is one of my favorite, “I don’t feel like cooking” meals to prepare. It requires two pieces of cookware (a pot to boil the pasta and a skillet for the sauce) and less than 20 minutes to prepare. And it’s delicious. Plus, I always have the ingredients on hand to make it because they are all canned or jarred (except the feta cheese, which is optional anyway). Even better, Mini Eats likes it and it’s easy for her to eat without assistance.

And if I still haven’t sold you on this pasta dish, I’ll mention that you can make as little or as much as you want with about the same amount of effort. Just use smaller or larger cookware.

Most of the work happens in this one skillet. Easy to cook and easy to clean.

This meal isn’t rocket science–add what you like; skip what you don’t like–but I’ll give you a recipe anyway.

Mediterranean Pasta
serves 2-4

6-8 ounces dried penne pasta
2 tablespoons olive oil
1 can (~14 ounces) diced tomatoes, drained
1 tablespoon (one bulb) minced garlic
1/2 jar (~6 ounces) marinated artichoke hearts
1/2 jar (~6 ounces) roasted red or red and yellow peppers
1/4 cup kalamata olives
1 heaping tablespoon capers
1/2 teaspoon each: dried crushed rosemary, oregano, and basil (add more as desired)
salt and pepper to taste
2-4 ounces crumbled feta cheese

Cook pasta in salted water according to directions. Penne usually takes a bit longer to cook than smaller pasta.

Meanwhile, combine the remaining ingredients (except salt, pepper, and feta) in a large skillet and simmer over medium high heat until the water cooks down slightly into a sauce and the flavors combine (about 10-15 minutes). Stir occasionally. Add salt and pepper to taste.

When done, drain the pasta and place in a large bowl. Add the sauce and stir in the feta.

Eat and enjoy the satisfaction of knowing this plate of pasta would cost $12-18 in a restaurant.

Posted in Entrees, Recipes | 6 Comments

Tomato Coconut Curry with vegetables

Tomato Week II: Tomatwo continues with a post that’s gloriously appropriate for a Wednesday. See, today’s post is not a recipe. I’d love to have a recipe here for tomato coconut curry, but I made a curry five different times with vastly different results each time. One great, three fair (one of which was a peanut sauce instead) and one not good. I will give you a nice ingredient list to start from should you decide to make try it yourself.

I did not make this curry. But someone did and liked it. Check it out at http://resourcefulcook.com/recipes/view/9s68j-spicy-chickpea-curry

2 cans coconut milk
1 can diced tomatoes
1 small can tomato paste (particularly if you use light coconut milk)
curry spices
vegetables, legumes, and/or nuts

Okay! So there ya go! Simmer all of those together and you have a really nice coconut curry. Of course, the spices part is the trickiest. I tried tablespoons and teaspoons of spices separately; I tried “curry powder”; I tried a combination of the two. And I can’t tell you what to do. But here are the spice essentials:

turmeric
cumin
coriander
paprika
ginger
cayenne
cardamom
garlic

Some combination of those is the right one, but I don’t know what it is (heavier on the first two, I do know that). Also,  some international groceries have pre-measured “Indian curry” spice packets, so look for those. But don’t rely on a curry blend from a jar alone; you’ll get a really bland curry. Trust me on that one.

After you’ve figured out that part, add vegetables. I like some sliced carrots that have been lightly roasted, small, thinly-sliced squares of tofu (or paneer, if you can find it), some chunks of onion (sauteed) and whatever else you like. For example, I’ve added chickpeas and cashews to my curry and really liked it.

Or—and this is what I recommend—order a curry from a restaurant (my favorite is Woodlands) and save  your diced tomatoes for something else.

Posted in Fun | 6 Comments

Vegetarian Beer Cheese Soup

I’ll be honest–I hadn’t ever heard of beer cheese soup until a few months ago. Apparently, it’s a thing in Wisconsin. They take it seriously. And it must be topped with popcorn. And it’s been in the back of my mind ever since I first tasted it.

So I consulted the Google for recipes and found two things that I found displeasing:
1. A list of ingredients including carrots, celery and onions (really, just a mirepoix as a base). I do not like celery. I will not buy it or eat it.
2. A list of ingredients that included Worcestershire sauce which, many people do not realize, is not vegetarian (anchovies!).

I also discovered a fair number of cheater recipes that used cream of chicken soup. Again, no thanks. Besides, I thought to myself, isn’t this soup supposed to be pretty much beer and cheese with a little kick? Yes, self. Yes, it is.

So, what does this have to do with Tomato Week II: Tomatwo? Well, my real inspiration for the soup was this can of RedGold tomatoes with chilies I had that I figured would add just the right amount of kick (I admit to being a bit of a wimp where chilies are concerned) and create a really good base for the soup. No need for all that cutting and chopping and…and…celery. ::shudder::

Make a roux, add some broth, some beer, and some cheese (plus a little flavor boost) and that’s it. Beer cheese soup. It’s that simple.

beer + cheese = soup. simple!

Almost. There are a few key things to note.

First, use good cheese. I found the best was a combination of half havarti and half extra, extra sharp yellow cheddar. This yielded a nice, creamy texture but still had a nice bite from the cheddar.

Second, use good beer. I used Blackstone Nut Brown Ale (made right here in Nashville). This is not a beer I’d ever drink because it’s heavy and strong, but it was the perfect beer for this soup. A dark ale, a stout…not a light beer. Don’t bother.

Third, unless you’re some sort of roux savant, you’re going to get teeny tiny lumps from the flour even with the sifting and the whisking. Either don’t be bothered by it or get out the immersion blender (like I did). I am, however, open to suggestions as to how to avoid the lumps. They’re not that bad, though. Just a little visually displeasing. Still delicious. [Update: see Glenna's comment below for a great tip on how to avoid souplumps.]

So, if you’re wondering, “should I make this soup?”, the answer is yes. I’ve gotten positive reviews from lovers of both cheese and beer, from people who like cheese but not beer, and even from people who do not like creamy soups. And the alcohol cooks out, so it’s family-friendly!

Vegetarian Beer Cheese Soup
serves 4-8, about 2 quarts

4 tablespoons olive oil
1/4 cup diced onions
1 can RedGold petite diced tomatoes with green chilies (10 or 14.5 oz)
1/3 cup flour, sifted
1 12-ounce bottle of dark beer
2 cups vegetable broth
4 cups (about a pound) shredded cheese (half sharp cheddar, half havarti)
1 teaspoon Liquid Smoke
salt and pepper to taste
paprika to garnish

In a large saucepan or stock pot over medium-high heat, combine the onions and olive oil and saute until transluscent. Add the diced tomatoes. Once heated, slowly add the flour, whisking briskly to avoid lumping.

Slowly add the beer, then broth, and Liquid Smoke. When the liquid begins to simmer, add the cheese by handfuls, stirring until completely melted.

Add salt and pepper to taste and paprika to garnish.

Posted in Entrees, Recipes, Side Dishes | 23 Comments